
So, finally got the chance to open up my new MBP late last night. First off, I think the box is getting smaller with every release. As can be seen, the top lid of the box has a piece of thick black padding glued to it to protect the MBP which sits underneath like a big silver slab. Note the black "Designed by Apple in California" tag. You're going to see them in many places. Here, you pull on it to lift the MBP out of the tray that it sits in.

Here you see the tray that the MBP rests in along with the long tab that helps you pull it out. The black tray is very much like the tray in the iPhone packaging, just much larger obviously.

Underneath the tray you have the AC adapter and cords and then a long, flat black box that contains the install discs, manuals, and Apple stickers. Underneath the black box is a narrow deep trench that they place any extra accessories you may have ordered along with the MBP. In my case, it was the mini-DisplayPort to DVI adapter.

This is just a quick shot of the opened box that contains the documentation and discs and the DVI adapter is in that long white plastic packaging on the right. Apple seems to really like that type of packaging for their cords and accessories.

Also included in the flat black box is this neatly folded black cleaning cloth to wipe down the MBP's screen with. The iPhone came with one so I was semi-expecting this. Nice touch still.

So that's it for the contents. The MBP itself is covered with the now ubiquitous plastic wrap that Apple has been using with pretty much all of their products these days. A bit disappointing as I prefer the cloth-like bag that the old MBPs came in.

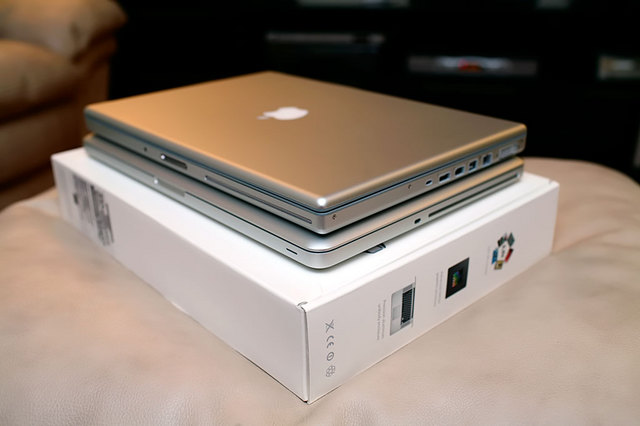
From the top there's pretty much no major difference in the overall look of the MBP series.

So the big change with these brick MBPs are in the port layouts. All available ports are now situated on the left side of the MBP. And there are fewer than before. Gone are the separate Firewire 400 and 800 ports and in its place, just one Firewire 400/800 combo port. Not a big issue for me as I'm not a big Firewire user. I have one external hard drive case that connects via FW800 and that's pretty much it. And since FW can be daisy-chained, I don't really foresee much of a problem here. The two USB2.0 ports are still there and at least this time they're both on the same side of the machine. Unfortunately, for my computing set up at home, all the ports are on the wrong side. I have my MBP on a stand on the left and my Dell 24" LCD on the right with my KVM switch and USB hub inbetween. I don't really want to reverse the layout so I guess I'll just have to deal with longer cords everywhere. *sigh*
Also on the left side now is the battery life indicator. They've added 3 more indicator lights and each light is tiny compared to the old on-battery ones.

So now with all the ports on the left side, they've shifted the Superdrive over to the right and stuck the safety lock slot in front of it too. Nothing too special about either. The front of the unit has changed a bit though. The IR sensor and sleep light is now located where the Superdrive used to be and there is no longer a push button latch to keep the lid closed. Now there's just a groove where you fit your fingers under the lid to lift up. This is nothing new, the old MacBooks have this design already.

The rear of the unit is now trimmed in black instead of the gray with the previous models. The trim also takes up more space than before. The LCD can now also tilt back more than with the previous models. A limitation that I've run into a few times in the past.

The bottom is a bit plainer than the previous MBPs as the battery is now situated under a thin aluminum cover. The footpads are now much bigger than before and in a first, are no longer just glued on to the bottom case. So no more lost footpads! The new footpads actually go through the bottom case and are held in position on the interior side because the piece inside is larger than the hole itself. However, the footpads are not as thick as before.

Now with this new model, the battery is no longer part of the case itself. It's now hidden under a thin but relatively sturdy aluminum cover that takes up the front third of the bottom of the case. To get to the battery, you push down on the rough part of the latch which pops up the closer side of the cover.

Once the cover is lifted off, the long rectangular battery is situated on the right with the hard drive bay to the left. The battery has a plastic tab (again with the tabs) that you can pull on to remove it from its bay.

The hard drive is now easier to swap than the memory. One Phillips screw holds the drive down in place and again, a plastic tab taped to the side of the hard drive to help you pull it out. Once the hard drive is out, you just disconnect the SATA cable to completely remove the drive. However, you still need a Torx driver to remove the 4 hard drive mounts from the existing drive so that you can reinstall them on the new drive that you're putting in. You also may want to peel off the plastic tab and stick it on your new drive for future use. But peeling the tab off causes it to lose much of its stickiness so you can only do this so many times before it just doesn't stick anymore. Anyway, stupid easy compared to the old models where you had to unscrew like 20 screws all along the bottom and sides and then carefully pop up the the entire keyboard side of the case. Although I did that often enough to be able to swap drives in less than 10 minutes.
As for the memory, you actually have to unscrew and remove the entire back half of the bottom case to get to it. There's not all that many screws to deal with (compared to the previous model) but still a bit more of a chore. I don't quite understand why they couldn't make it as easy overall as with the previous MacBooks.

Raising the lid to the open position was pretty nice. The hinges aren't super stiff as it was in previous Powerbook G4 and MBP models where you had to keep a finger on the bottom case to keep it from rising with the top as it as being opened. One hand operation is now the norm. There's the typical white sheet covering the keyboard and staring at the screen is like looking at a miniature iMac screen. Black borders, all glass, all glossy.

Took a quick glance at the keyboard to make sure I wasn't a "NNM" victim. =) The separate key layout I'm already used to since I've owned the previous gen black MacBook for a short while and I'm also currently using the Apple wireless keyboard which looks the same. The trackpad obviously looks different because of it's larger size and now lack of a separate button area. They say the trackpad is now glass which is hard to tell since the grey underneath makes it look like just another trackpad to me. It is smoother than previously though. Not having a physical button is not an issue either as the bottom half of the trackpad clicks like a button anyway so I didn't give it a second thought. You can set one of the lower two corners to act like a right click in System Preferences but I find doing the two-finger click to work much better.

As for the screen, how glossy is it? Well, as you can tell from above, it's pretty darn glossy. Overall, it's noticeably glossier than the old MBP. When the machine is off at least.

When the machine is on however, it's not an issue. Schiller wasn't kidding when he said the brightness of the screen would counteract the glossiness. To a certain point though. If you're looking at the screen off center or if you have a bright light source behind you or to the side, you'll notice the reflection. You'll notice it more if your background is black. So overall, I don't have a problem with it. But I've never had a problem with glossy screens to begin with so YMMV. And I'm not the type to be using my laptop outdoors so no idea at this point how it fares outside on a sunny day.

Anyway, I thought I'd take a few shots of it from all angles next to my current refurb 2.4Ghz MBP which will be Erin's new laptop after I'm done moving my stuff over and setting it up for her.

Here you can see the much cleaner bottom on the new MBP now that they've covered the battery.

The new MBP has more gradual sloped edges than the old and while it's only .05" thinner, the lid looks a lot thinner than the previous model.
Overall the brick MBP feels like a more solid machine. The casing for the old MBPs always had a certain flex to them that made them feel a bit flimsier than they probably were.

There's also a lot less screws all around. The new MBP is also a teeny bit larger in all other dimensions besides height so I'll have to check if my existing laptop sleeve will fit it or not. *sigh*

The screen actually doesn't look too much different from the older model. They're both LED backlit so quite bright at its maximum setting. The new glass-covered screen has a certain oomph to it though when watching video.
And one last note, the AC adapter for the old model works for the new. So little bonus there as that means I don't have to pick up an extra adapter just for this new machine. Anyway, going to be a pretty busy week for me as I transition my data over to the new machine. I've run Xbench a few times and interestingly, there was very little difference in score between the NVIDIA GeForce 9400M and 9600M GT cards. I guess XBench doesn't get into whatever it is that makes the 9600M GT rock. Xbench also crashed every other run or so which was a bit odd so not entirely sure how trust-worthy these results are currently.
